

How To Install Nest Fire Alarm
Install Nest Protect
Y'all can easily install your Google Nest Protect in merely a few minutes. Follow the steps in this article to learn how.
To get an overview of Nest Protect installation, you can lookout our videos to walk you lot through the steps. The steps are different for 1st and 2nd generation Nest Protects.
How to tell which Nest Protect you lot have
To set upwardly and install your Nest Protect, yous volition demand:
- A Wi-Fi connexion
- Your Wi-Fi countersign
- A telephone or tablet (iOS or Android)
- A Phillips screwdriver
Before yous begin, make sure you're aware of local regulations. Specific requirements for smoke alarm installation vary between states and regions. Check with your local condom agency or Burn down Department for current requirements in your surface area.
Where to install your Nest Protect in a room
Which rooms in my home need a Nest Protect
You lot can also have a Nest Pro set and install all your Nest Protects for yous. To get a professional to aid install and set upward your Nest products, contact our installation partner, OnTech. After they've installed your Nest Protects, they'll give you a demo and respond whatsoever questions you have.
Select your Nest Protect
Each kind of Nest Protect has different installation instructions. Select the Nest Protect that you accept to get to the right instructions. If y'all're not sure which Protect you lot have, you can see how to tell here.
How to install your 2nd gen wired Nest Protect
| one. Go the Nest app | Before yous install your Nest Protect on the ceiling or wall, set it Of import: If yous already have the Nest app installed on your |
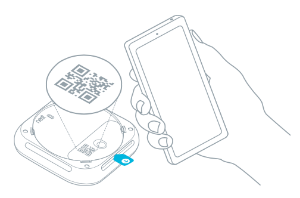
| 2. Add together your Protect to the app | The Nest app will guide you through each footstep: scanning the Tip: Lay everything out on a tabular array for easy setup. How to set upward a 2nd gen Nest Protect with the Nest app Write down the Entry Key for each Protect you're installing and |
| three. Have more Nest | The Nest app will ask you if you have additional Nest Protects Tip: Your Nest Protect came packed in a clear plastic dust |
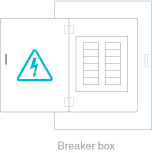
| 4. Plough off power | Protect yourself and avoid blowing a fuse. Switch off the correct Warning: Failure to turn off power may effect in serious |
| five. Remove your former smoke alert | Note: If y'all don't take an old fume alarm, skip to step 9. To forbid electrical shock, make certain the greenish power light is Tip: Your one-time smoke alarm might brand a loud noise when you |
| half dozen. Remove the old | Unscrew the backplate from the electric box. Save the screws Tip: All smoke alarms prefer to alive in a dust free surface area, so |
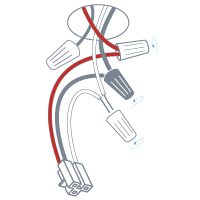
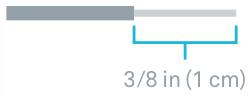
| 7. Remove the old | Twist the wire connectors counterclockwise to unscrew them The exposed wire should be straight. |
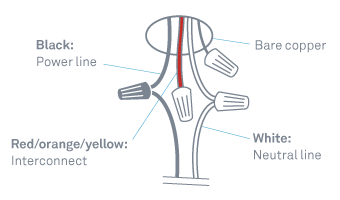
| 8. Attach the Nest | Hold the white wire ends together, cap them with a wire |
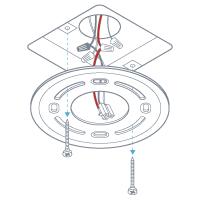
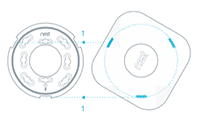
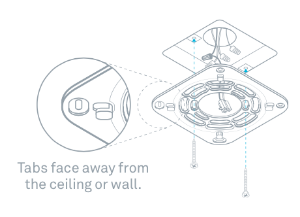
| 9. Install the Nest Protect backplate | Screw the Nest backplate to the existing electrical box, reusing Important: The backplate's Nest logo must face away from the Tip: If the electric wiring box is recessed and isn't flush with |
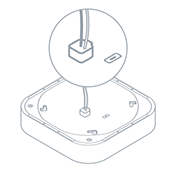
| 10. Connect power | Plug the 120V connector into the dorsum of your Nest Protect. |
| 11. Install your Nest | Tuck whatsoever excess wiring into the electric box showtime. Hold Nest Tip: To remove your Nest Protect (for cleaning or battery |
| 12. Switch power back on | |
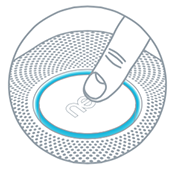
| 13. Press to test | Later on yous've installed all of your Nest Protects, printing the button During the test, every Nest Protect in the house should speak How and when should I test my Nest Protect? Important annotation: If one of your Nest Protects doesn't speak up Learn about wireless interference and how to troubleshoot it If it still doesn't speak up during the examination, reset it to defaults How to reset Nest Protect and erase all your personal settings |


How to install your 2nd gen bombardment powered Nest Protect
| 1. Get the Nest app | Before you install your Nest Protect on the ceiling or wall, set it Important: If you already take the Nest app installed on your |
| 2. Add your Protect to the | The Nest app will guide you lot through each footstep: scanning the Tip: Lay everything out on a tabular array for easy setup. How to set upwardly a 2nd gen Nest Protect with the Nest app Write downward the Entry Key for each Protect you're installing and |
| 3. Have more Nest | The Nest app will enquire you lot if you have boosted Nest Protects Tip: Your Nest Protect came packed in a clear plastic dust |
| four. Remove your former fume alarm | You lot may accept to twist the alarm to release it. Unscrew and Tip: All smoke alarms prefer to live in a grit free area, so |
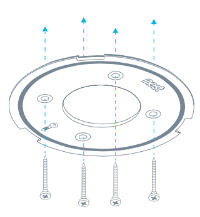
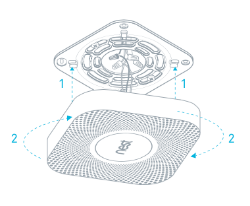
| 5. Install your Nest Protect backplate | Screw the Nest backplate to the ceiling or wall using the Of import: The backplate's Nest logo must face up away from the |
| 6. Install your Nest | Hold Nest Protect against the backplate and turn information technology clockwise. Tip: To remove your Nest Protect (for cleaning or battery |
| 7. Printing to test | After yous've installed all of your Nest Protects, press the push During the test, every Nest Protect in the business firm should speak How and when should I test my Nest Protect? Important note: If one of your Nest Protects doesn't speak up Larn nearly wireless interference and how to troubleshoot it If it still doesn't speak upward during the test, reset it to defaults How to reset Nest Protect and erase all your personal settings |

How to install your 1st gen wired Nest Protect
| ane. Become the Nest app | Before you install your Nest Protect on the ceiling or wall, set it Of import: If y'all already have the Nest app installed on your |
| 2. Add your Protect to the | The Nest app will guide you through each stride: scanning the Tip: Lay everything out on a table for easy setup. How to gear up a 1st gen Nest Protect with the Nest app Write down the Entry Fundamental for each Protect you're installing and |
| 3. Have more Nest | The Nest app will ask you if you lot have additional Nest Protects Tip: Your Nest Protect came packed in a plastic dust cover. |
| iv. Turn off ability | Protect yourself and avoid blowing a fuse. Switch off the correct Alarm: Failure to plough off power may outcome in serious |
| v. Remove your one-time smoke alarm | Note: If yous don't have an sometime smoke alarm, skip to footstep 9. To prevent electrical shock, make sure the green power light is Tip: Your onetime fume alert might make a loud noise when y'all |
| 6. Remove the erstwhile | Unscrew the backplate from the electrical box. Save the screws Tip: All fume alarms adopt to alive in a dust gratis surface area, so |
| 7. Remove the erstwhile | Twist the wire connectors counterclockwise to unscrew them The exposed wire should exist directly. |
| 8. Attach the Nest | Hold the white wire ends together, cap them with a wire |
| nine. Install the Nest Protect backplate | Screw the backplate to the existing electric box, reusing the |
| 10. Connect power | Plug the 120V connector into the back of your Nest Protect. |
| xi. Install your Nest | Constrict any excess wiring into the electric box and push Nest Tip: To remove your Nest Protect (for cleaning or battery |
| 12. Switch power dorsum on | |
| 13. Printing to test | Subsequently you've installed all of your Nest Protects, press the push During the test, every Nest Protect in the firm should speak Important note: If one of your Nest Protects doesn't speak upwardly Larn about wireless interference and how to troubleshoot it If it nonetheless doesn't speak up during the test, reset it to defaults How to reset Nest Protect and erase all your personal settings |


How to install your 1st gen battery powered Nest Protect
| ane. Get the Nest app | Before you install your Nest Protect on the ceiling or wall, set up it Of import: If y'all already have the Nest app installed on your |
| 2. Add your Protect to the | The Nest app will guide y'all through each pace: scanning the Tip: Lay everything out on a table for easy setup. How to set a 1st gen Nest Protect with the Nest app Write down the Entry Key for each Protect yous're installing and |
| 3. Accept more than Nest | The Nest app will ask yous if y'all have additional Nest Protects Tip: Your Nest Protect came packed in a clear plastic dust |
| 4. Remove your old fume alert | You may have to twist the alarm to release information technology. Carefully remove Tip: Your old smoke alarm might make a loud dissonance when you |
| 5. Install your Nest Protect backplate | Spiral the Nest backplate to the ceiling or wall using the Tip: All smoke alarms adopt to live in a dust free area, then |
| 6. Mount your Nest | Push Nest Protect onto the backplate tabs and give information technology a slight Tip: To remove your Nest Protect (for cleaning or bombardment |
| 7. Press to test | After y'all've installed all of your Nest Protects, press the button During the test, every Nest Protect in the house should speak How and when should I examination my Nest Protect? Of import note: If one of your Nest Protects doesn't speak upward Learn about wireless interference and how to troubleshoot it If it still doesn't speak up during the exam, reset it to defaults How to reset Nest Protect and erase all your personal settings |

Was this helpful?
How can we improve information technology?

Source: https://support.google.com/googlenest/answer/9231672?hl=en
Posted by: foxsillon.blogspot.com
0 Response to "How To Install Nest Fire Alarm"
Post a Comment